
Zero to serving DNS
This tutorial takes you from the Azure Marketplace to a test VNet resolving through DTM, in the order that avoids the classic day-one mistake: pointing VNet DNS at a server you have not proven yet. You will deploy a node, create one record with automatic failover, watch that failover actually happen, and only then touch your VNet’s DNS settings.
1. Deploy the single-region plan
Section titled “1. Deploy the single-region plan”In the Azure Marketplace, deploy DTM’s single-region plan into a dedicated
/27 subnet in your VNet (for this scenario, 10.0.250.0/27). Take the
wizard’s defaults except: set the DNS client CIDR to cover the subnets your
clients and backends live in (here 10.0.0.0/16), and note the Admin CIDR
(the adminAddressPrefix parameter) for later hardening. The deployment
creates one node VM with a Premium SSD data disk holding the node’s local data
store, a Key Vault for the cluster’s secrets, an NSG scoped to your CIDRs, and
a stable private IP.
Deploy covers every parameter and permission; if the deploy
fails at role assignment, that page’s
permissions section is the fix.
Verify, and capture the node’s IP for everything that follows:
az vm list-ip-addresses -g rg-dtm-poc -o table# VirtualMachine PrivateIPAddresses# ---------------- ------------------# dtm-node-1 10.0.250.42. Verify the node is ready
Section titled “2. Verify the node is ready”Before logging in, before creating anything, confirm the node is serving:
curl -sk https://10.0.250.4:8443/readyz# 200: readyA single node deployed without seeds goes straight from starting to ready, so
a 503 here means the deployment is still finishing (or failed); see
Verify the cluster before continuing.
3. Log in for the first time
Section titled “3. Log in for the first time”Retrieve the initial administrator password from the deployment’s Key Vault (it is generated on the node at first boot and never appears in the template or its outputs):
az keyvault secret show \ --vault-name kv-dtm-poc \ --name dtm-initial-admin-password \ --query value -o tsvBrowse to https://10.0.250.4:8080 and sign in as admin. Your browser will
warn about the certificate: this is the node’s first-boot web UI certificate,
self-signed with two-year validity and the node’s IP as its subject
alternative name. For a POC that is acceptable; before production, replace it
with one your browsers trust, per TLS certificates.
Verify: the dashboard loads and shows one node,
alive.
4. Retire the bootstrap login
Section titled “4. Retire the bootstrap login”Do two things before creating any DNS data: change the admin password (the
Key Vault copy is a bootstrap secret, not a password manager), and create a
named admin account for yourself so the audit log records a person, not a
shared login. Both are on the Users page; see
users and access for the role model.
Verify: sign in with the named account in a private browser window before signing out of the bootstrap session. A login that works in a private window is the proof; one you assume is not.
5. Create the zone and one failover-ready record
Section titled “5. Create the zone and one failover-ready record”Create zone example.internal. (trailing dot), then one A record named
app with two values, 10.0.1.10 and 10.0.1.11, and a TTL of 30,
and set its Load balancing method to round-robin while you are in
the form (with no policy set, DTM returns all healthy values in every
answer; round-robin is what makes step 6’s rotation visible). One record
with two values, not two records: load-balancing policy and health checks
attach per record and apply across its values. The
quickstart shows the same step over the API and
Terraform if you prefer those paths.
Verify: the zone shows active in the UI (a new zone is created active).
6. Prove resolution with dig, not with the VNet
Section titled “6. Prove resolution with dig, not with the VNet”From a client VM, query the node directly:
dig @10.0.250.4 app.example.internal +short# 10.0.1.10 (repeat the query; both IPs appear across answers)DTM answers with one healthy value per query under round-robin, so repeated queries rotate across both backends.
7. Attach a health check and switch to failover
Section titled “7. Attach a health check and switch to failover”Edit the app record: enable a TCP health check on port 443 with a
5 second interval, and change the load-balancing method to failover.
Under failover, answers contain only the first healthy value in order, so
dig now returns 10.0.1.10 every time while it is healthy. See
health checks and
load-balancing methods for what each knob does.
Verify that both backends pass their probes:
curl -sk https://10.0.250.4:8443/api/v1/health/status \ -H "Authorization: Bearer $DTM_TOKEN"# both checks: "status": "healthy"(Capture $DTM_TOKEN as shown in the
quickstart,
or just watch the Health Checks page in the UI.)
8. Drill the failure before your users find it
Section titled “8. Drill the failure before your users find it”Stop the app listener on the primary backend, 10.0.1.10 (stop the
service or its VM; under failover, stopping the standby would show nothing).
Start a stopwatch and keep repeating the dig from step 6.
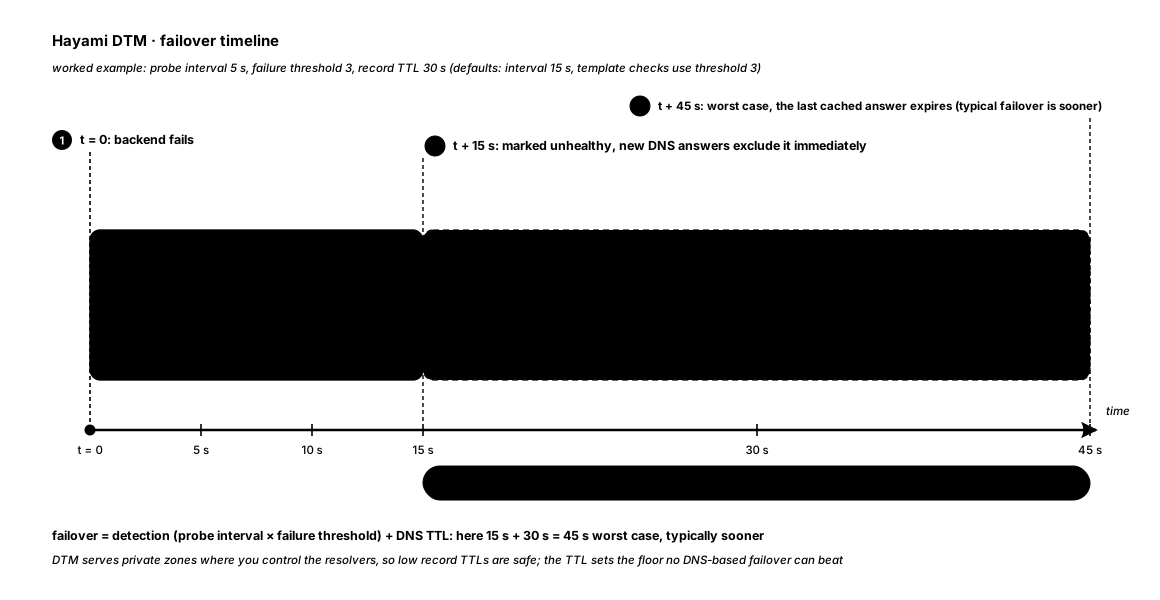
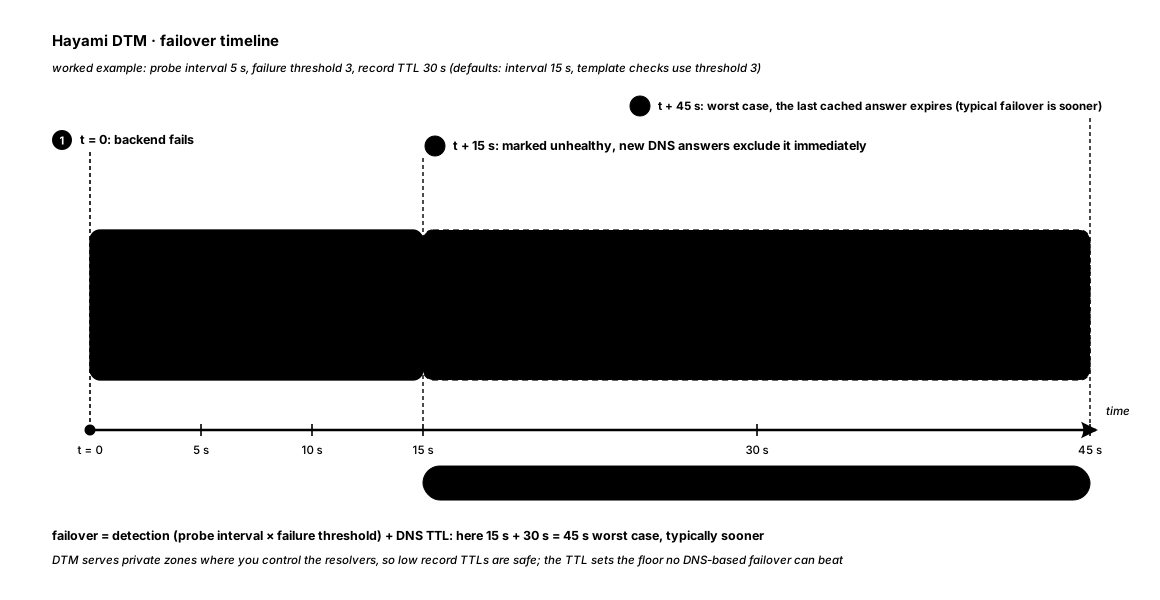
The math is predictable: checks created from a record template use a fixed
failure threshold of 3, so with a 5 second interval the node marks the
backend unhealthy after about 15 seconds, and every new answer flips to
10.0.1.11. Clients holding the cached answer age out within the record’s
30 second TTL, for a worst case of about 45 seconds end to end:
Restore the backend and keep watching: after two consecutive successful
probes (about 10 seconds), answers return to 10.0.1.10.
Verify: you saw the flip and the recovery with your own stopwatch. That number, not the documentation, is what you quote in your runbook.
9. Cut the test VNet over
Section titled “9. Cut the test VNet over”Only now, with resolution and failover proven, point a test VNet at DTM:
az network vnet update -g rg-test -n vnet-test --dns-servers 10.0.250.4Azure clients pick up DNS server changes on restart or DHCP lease renewal, so reboot the test VM (or wait out its lease) before judging the result.
Verify both halves of resolution from the test VM, with no @ this time:
dig app.example.internal +short # answered by DTM: 10.0.1.10dig www.microsoft.com +short # recursion via the default forwarderInternet names keep resolving because the single-region deployment configures
a default forwarder to Azure’s platform resolver (168.63.129.16) at first
boot; see forwarders for how that pipeline works.
Wrap-up
Section titled “Wrap-up”You now have the whole day-one arc: deployed, verified, one health-gated name, a failover you have personally witnessed, and a test VNet resolving through DTM. The checklist you just walked:
| Done | Step |
|---|---|
| [x] | Node deployed and readyz returns 200 |
| [x] | Bootstrap admin retired for a named account |
| [x] | app.example.internal created as one record, two values |
| [x] | Resolution proven with dig against the node |
| [x] | Failover drilled and timed |
| [x] | Test VNet cut over, internal and internet names verified |
Where next
Section titled “Where next”- Production readiness pass: SSO, NSG tightening, backups, and governance before this leaves the lab.
- Adding nodes (scaling out): the second node that turns a POC into something you can rely on.
- Wire observability end to end: metrics, dashboards, and a fired test alert before your first real incident.
Need a hand? Email [email protected].
Last validated: 2026-07-26